String Replacement

Optimize Your String Installation:
Ensure a flawless playing experience by avoiding strings with twists or kinks. Before installation, meticulously inspect the new strings, confirming they are smooth and defect-free. This attention to detail not only enhances playability but also minimizes the likelihood of undesirable fret buzz during your performance.
Acoustic String Replacement Guide:
For acoustic guitars with bridge pins securing the strings, follow these steps for optimal string replacement:
Removing Strings:
Loosen the string at the machine head before attempting to remove the bridge pins.
Gently use an acoustic pin remover to take out the bridge pins, ensuring you preserve both the pin and the string ball end.
Installing New Strings:
When installing new strings, make sure the ball ends fit securely in the bridge hole, allowing the pin to hold the string under tension.
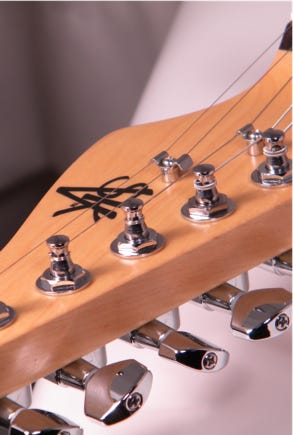
String Winding:
Secure the strings in the bridge area and wind them cleanly and tightly around the tuning machines from top to bottom.
For wound strings, aim for a minimum of 2 to 3 wraps around the post, and for plain or unwound strings, go for a minimum of 3 to 5 wraps.
Tuning Machine Adjustment:
If the tuning machines have sealed gears with sealed grease lubrication, note that the setscrews for the tuning buttons can be adjusted.
Carefully use a Phillips (+) screwdriver to tighten the small screw, increasing the tension as needed.
Following these steps ensures a smooth and effective acoustic string replacement, maintaining proper tension and tuning stability.

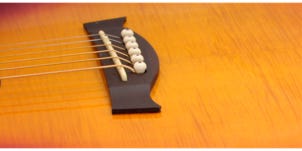
Nylon string models
String Attachment Technique for Enhanced Stability:
Achieve optimal string security at the bridge through a methodical tying process:
Bridge Attachment:
Start by inserting the string through the designated string slot at the bridge.
Secure the string by skillfully wrapping it over and under itself until it forms a stable tie. This technique is commonly referred to as "tying the string."
Tying Guidelines:
For the first through third strings, limit the number of ties to no more than two or three for each string.
Tuning Machine Securing:
At the tuning machines, insert the end of the strings through the machine head post.
Lock the string in place by passing it underneath itself, as illustrated for clarity.
String Tensioning:
After tying the string, ensure the longer end is pulled taut towards the headstock.
By adhering to this meticulous string attachment process, you guarantee enhanced stability and minimize the risk of string slippage, contributing to a more reliable and consistent tuning experience.
While string action is initially set at the factory, changes in temperature and humidity can impact an instrument. Acoustic guitar string action, determined by the saddle height at the bridge, may need adjustment. Here's how to address common issues:
Qualified Technician for Adjustments:
String action adjustments are best performed by a qualified technician.
Low String Action:
If string action is too low, it may result in fret buzz or unclear notes.
Remedies include inserting shims beneath the saddle to raise it or installing a higher saddle.
High String Action:
If string action is too high, consult a qualified technician for assessment and adjustment.
Regular checks and adjustments by a skilled technician ensure optimal acoustic guitar performance, adapting to environmental changes and maintaining playability.

String Replacement and Adjustment for Stop Bridge:
When replacing strings on a stop bridge, follow these steps:
String Replacement:
Thread the new strings through the designated string holes in the bridge.
Intonation Adjustment:
Use the two outer Allen screws to adjust intonation, moving the bridge forward or backward as needed.
String Height:
Modify string height by raising or lowering the two studs on either side of the bridge.
Utilize a flat-head (-) screwdriver for this adjustment.
These steps ensure proper string replacement and give you control over both intonation and string height for optimal performance on a stop bridge.
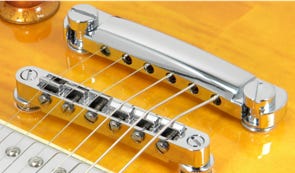
String Replacement and Adjustment for Standard Bridge with Bar Tailpiece:
When replacing strings on a standard bridge with a bar tailpiece, follow these steps:
String Replacement:
Thread the new strings through the string holes on the back of the tailpiece, bringing them up and over the saddle.
Intonation Adjustment:
Adjust intonation by moving the saddle forward or backward.
Utilize a Phillips head (-) screwdriver on the adjustment screw at the rear of the bridge for this adjustment.
String Height Control:
Modify string height by using a screwdriver to raise or lower the small adjustment screws on either side of the bridge.
Tailpiece Height Adjustment:
Adjust the height of the bar tailpiece by raising or lowering the two height adjustment studs on either side of the tailpiece.
These steps provide comprehensive control over string replacement, intonation, string height, and tailpiece height for optimal performance on a standard bridge with a bar tailpiece.
When replacing strings on a guitar with two or six-point tremolos, follow these steps:
String Replacement:
Thread the new strings through the string holes on the back of the guitar.
Thread the strings through the tremolo block and up and over the saddle.
Intonation Adjustment:
Adjust intonation by moving the saddle forward or backward.
Use a Phillips head (+) screwdriver on the adjustment screw at the rear of the bridge.
String Height Control:
Modify string height by using a wrench to raise or lower the small Allen screws on either side of the saddle.
Overall Bridge Height Adjustment (Two Point Tremolo):
Two-point tremolos have an adjustment for overall bridge height on either side of the tremolo.
Tremolo Angle Adjustment:
Control the bridge angle by adjusting the tremolo springs under the tremolo plate on the back of the guitar.
Tighten the screws to lower the tremolo angle, and loosen the screws to raise it.
These steps provide comprehensive control over string replacement, intonation, string height, overall bridge height, and tremolo angle for optimal performance on guitars with two or six-point tremolos.
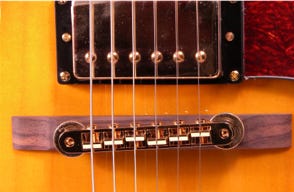
String Replacement and Adjustment for Adjustable Hollow Body Bridge:
When changing strings on a guitar with an adjustable hollow body bridge, follow these steps:
String Replacement:
Thread the new strings through the string holes on the back of the tailpiece and bring them up and over the saddle.
String Height Adjustment:
Adjust string height by turning the thumbwheel screws on either side of the bridge.
Clockwise turn lowers string action, and a counterclockwise turn raises it.
Intonation Adjustment for Hollow Body Bridges:
Note: The bridge is not fixed to the body for even string transfer.
To adjust intonation, loosen the strings and move the bridge forward or backward.
Recommended to change one string at a time to avoid the need for intonation adjustments.
These steps provide control over string replacement, string height, and intonation for optimal performance on a guitar with an adjustable hollow body bridge.
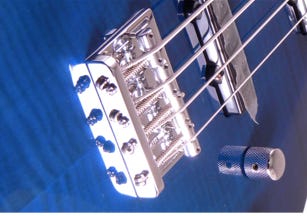
String Replacement and Adjustment for Bass Bridges:
When replacing strings on a bass with adjustable bridges, follow these steps:
String Replacement:
Thread the new strings through the string holes on the back of the tailpiece and bring them up and over the saddle.
Intonation Adjustment:
Adjust intonation by moving the saddle forward or backward.
Use a Phillips head (+) screwdriver on the adjustment screw at the rear of the bridge.
String Height Adjustment:
Adjust string height to raise or lower the saddle.
Use the correct Allen wrench for the adjustment.
Action Adjustment:
Note: Action may need readjustment after neck adjustment or changing strings.
Gradually increase action clearance from the treble side through to the bass side if using different gauge strings.
Setting String Action:
Different bridges have varying ways of setting string action.
Locking tremolos and Gibson® style TOM bridges use two studs for raising or lowering.
Start style tremolos have individual height adjustment for each string.
Modern tremolos may have both.
String action is a personal preference and depends on playing style.
Consider player preference for lower or higher action based on playing characteristics.
Adjust individual string saddles considering the fretboard radius.
Set high and low strings first, measure the distance between the top of the fret and the bottom of the string at the 12th fret.
Adjust middle strings to the same setting above the fret as the high and low strings.
These steps provide control over string replacement, intonation, string height, and action for optimal performance on a bass guitar with adjustable bridges.